


In the present scenario, NodeJS has become one of the most popular platforms to develop high-quality applications. Its open-source , cross-platform, JavaScript runtime environment features makes it an excellent option for developers and product owners.
Although app development companies have been using it for quite a long time, NodeJS is relatively new. Many still do not know about its particular features and the benefits they can have after learning them. In this blog I will try to make you understand the NodeJS best practices to help you develop a top-class application.
1. Prepare a well-defined structure for your Node.js Project
While developing an app, it can be challenging to manage a massive codebase with hundreds of dependencies. Therefore, it is better to divide and organize your code into small chunks and put them into a separate folder or codebase. Make sure that each unit is kept small and simple.
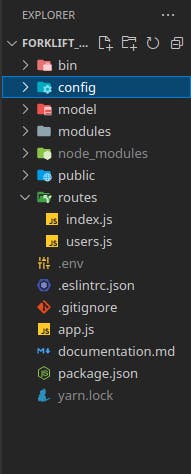
One of the best ways to do this is to design a small piece of software and divide the whole stack into independent components that do not share files with each other. In simple terms, you can have different modules to address various concerns pertaining to your application. These different modules can cater to and respond to different aspects of the client requests at the client-side. The folder structuring can also help structure and organize the code to make it clearer and more readable, easing the app development process.
2. Avoid Mutation in the original array
Mutation happens when we change a JavaScript Array or object without creating a new variable or re-allocating the existing one. In JavaScript, everything is referenced. It means if you mutate an array or object in JS, it will mutate the original array/object.
Mutation can cause a lot of errors while developing an app. It may lead to unpredictable and hard-to-debug errors where data becomes incorrect somewhere, and you have no idea how and where it happens.
Make code harder and complex to understand. At any instant, the value of an array or object might change and differ. Hence, you need to be careful while reading the values in the code.
Hers is an example . The first one will mutate the original array, and hence, you might encounter unforeseen bugs later.
const elements = [5,3,4,10,2];
const results = elements.sort().map(element=> element*2);


const elements = [5,3,4,10,2];
const results = [...elements].sort().map(element=> element*2);
In the second code, we create a copy of the element array, and that's why it's not affecting the original one.
3. Use a standard Style Guide
There can be times when you open a new file from a new project for the first time or get a file from a different developer. You spend the next few hours understanding the code, reformatting the braces, changing tabs from spaces, etc. This might take a lot of your time and stretch the process of app development.
To prevent this from happening and understanding the code easily, it is better to use a consistent coding style. For this purpose, you can use JavaScript linter tools like ESLint, which is a de-facto standard for checking common programming errors and fixing code style. There are other tools like Prettier and Beautify help format the fixes and work parallelly with ESLint.
4. Prefer Const/Let over Var
When you use const in a code and assign a variable, you can not reassign it. Using const will prevent you from getting tempted to use the same variable for multiple uses, making your code clearer. If you think you need to reassign a variable, for instance, in a for loop, you can use let to declare it. When you declare a variable using let, it will only be available in the block scope in which it was defined.
On the other hand, Var is function scoped not block-scoped, which means you can not declare variables inside the blocks making it more error-prone. Let’s understand this through an example:
console.time('timer')
for(var i =0; i<999999; i++){}
console.timeEnd('timer')
// timer: 7.90380859375 ms


console.time('timer')
for(let i =0; i<999999; i++){}
console.timeEnd('timer')
// timer: 3.73779296875 ms
Both the codes are almost identical in terms of logic. However, the second code (using let) will be nearly twice as fast as the first code (using var). This is because the scope of let and const is local to the blocks in which they are declared, while var creates the instance in the global scope. Therefore, we have to traverse the whole global object to access it, which is both time-consuming and error-prone.
5. Use Dependency Injection
You might not be aware that NodeJS comes up with unique features and NodeJS security best practices to make the programming and production of your application easy. However, working with dependencies (services) can be cumbersome due to the issues you can face while managing and testing the code.
But no worries, as there’s a solution for that too, and it’s called dependency injection . It is a software design pattern in which you can inject or pass one or more dependencies (or services) by reference, into a dependent object. With dependency injection, you can:
- Make the unit testing process streamlined and well-organized.
- Speed up your git-flow.
- Avoid purposeless module coupling.
6. Always use Asynchronous code
NodeJS is known for its asynchronous nature. JavaScript offers callback functions (functions that pass as an argument to other functions). These functions also allow you to describe the asynchronous behavior in JavaScript. However, when you overuse raw callback (like async-await), it affects the application control flow, disturbs error handling and semantics that is more similar to synchronous code. The issue with synchronous code is that it blocks any other code from running until the former code gets completed.
On the other hand, asynchronous code keeps your code free from blockages and allows you to run things in parallel. Therefore, you should use Asynchronous JS code wherever possible, and to make it possible, ES 6 ( ECMASCRIPT 2015 ) came out with the Promises. It makes your code easier to read and test while providing a better error handling platform and functional programming semantics. Let’s understand this concept more clearly through an example.
console.log('First!');

setTimeout(function second(){
    console.log('Timed Out!')
}, 0000)

console.log('Final!');
7. Conduct Unit testing and Final testing
Testing is undoubtedly a crucial stage in every project. The entire flow of the project, not just the outcome, depends on testing since buggy code can slow down the app development process and cause other troubles too.
The best way to test your application is to test them by units. The primary goal of the unit testing is to pick out a section, isolate it and verify for its correctness. Unit testing can help in:
- Enhancing code quality
- Detection of errors in the earlier stage
- Development cost reduction
Unit testing helps the programmers detect the faults in the project’s different parts in the earlier stages. After completing the app development process, you need to perform final testing of your application to ensure that it is ready for launch. There are many things you can check for, such as:
- Running your app in production mode
- Enabling Gzip compression
- Using a load balancer like nginx
- Accessing PM2 to manage your NodeJS application on Server
- Using clustering to create multiple instances of your application
- Implementing rate-limiter in your APIs like express-rate-limiter
- Testing all these checkpoints will help in boosting up your app’s performance and creating a robust NodeJS application.
Conclusion
Okay ... This was all about how you can use the Node.js best practices to write better code with reduced effort. Although there can be more such practices for an excellent app development process, I tried to present you with the most widely used and standard ones. Since now you know enough about developing an app with NodeJS, go ahead and implement your knowledge. With that said , See you in the next Blog.